January 31, 2013

Chocolate Chip Pudding Cake

This is by far the easiest, and quite possibly the most delicious, cake you will ever have. Lars requests that my mom make "pudding cake" every year around his birthday, and I have yet to meet anyone that doesn't like this cake. Plus, it's delicious for breakfast!  :)


Chocolate Chip Pudding Cake
Serves 12

1 box vanilla cake mix
1 box (small) instant vanilla pudding
1 box (small) instant chocolate pudding
1 cup chocolate chips*
1/2 cup sugar
4 eggs
1 1/2 cups water
3/4 cup canola oil
1 cup chopped pecans (optional)*

1. Preheat oven to 350º. Spray and flour a Bundt pan.*
2. Mix all ingredients together.
3. Pour batter into prepared Bundt pan.
4. Bake for approximately 1 hour. Test cake with a toothpick - make sure it comes out clean.
5. Cool completely before removing from pan.
6. Enjoy!

*Tips and Tricks:
  • I used a mixture of dark and milk chocolate chips. Feel free to use semi-sweet, your favorite variety, or simply whatever you have on hand.
  • I love pecans, but for some reason I always leave them out of this cake. The cake is just so moist and tasty that I don't want to have something crunchy break that up. That's personal preference though. If you want the crunch, by all means add the pecans.
  • If you've never sprayed and floured a Bundt pan, here's what you do. First, spray the pan liberally with cooking spray. Next, use a spoon to sprinkle flour on every inch of the inside of the pan. Then, start turning the pan in one hand and banging the outside of it with the other hand to distribute the flour evenly. This may seem a bit awkward at first - the whole idea is to get the spray and flour to evenly coat the pan so the cake will come out clean.
  • On that note, this cake needs to cool completely before you remove it from the pan. I'm impatient, so this is super difficult for me to do, but it is the most important thing you can do unless you want to be eating cake crumbles. This cake will tear apart when you try to take it out of the pan if it's the least bit warm. It's still delicious when that happens, it just makes it difficult to make the presentation of the cake pretty after that. Just for reference, I let the cake cool this past time for 2.5 hours, and it came out beautifully. 
  • Although it will only take you 5 minutes to mix the cake, the time from putting it in the oven to being able to serve it will be quite a while. This cake is actually better the second day so feel free to make it one day before you need to serve it. If you do this just try your best to not let your family eat any, otherwise you may not have a cake to take the next day.  :)

January 30, 2013

Are You an Introvert?

I am what I like to call a "closeted introvert". I use that term because most people, if asked about me, would never describe me as someone who is shy or withdrawn. I am very personable, and every job I have ever held has been one with large amounts of people interaction. Truthfully though, people wear me out. Social activities, especially if they are not among close friends and require copious amounts of small talk, are exhausting. I read the article entitled "Caring for Your Introvert" quite some time ago so when Lars stumbled upon it the other day, I felt the need to share it. If you're an closeted introvert like me, know that you're not alone, and if you're a proud extrovert, hopefully reading it will give you a bit more insight into your introverted friends and families. Remember, be kind to the introverts in your life.  :)

January 29, 2013

Casual Work Wear

I just started a new part-time job this week (woohoo!) while I wait to hear about medical school. The dress is business casual, and I'm loving the look below for a polished and put together, yet low key work outfit.

Work Wear

January 28, 2013

Dark-Trimmed Windows

I'm currently loving dark-trimmed windows in homes. Even in with a tradition home design, windows with dark trims make everything seem a bit more modern, don't you think?

                                          Traditional Kitchen design by Los Angeles Architect Studio William Hefner


                                 Contemporary Kitchen design by Birmingham Architect Dungan Nequette Architects

January 25, 2013

Silver Linings Playbook

We don't always go see many movies in theater - we're more of let's-save-our-money-and-rent-it-on-redbox people. However, I like to make a point to attempt to see all of the movies that were nominated for best picture at the Golden Globes each year. We've already seen a few, and this weekend we're off to see Silver Linings Playbook.


I'm a big fan of both Bradley Cooper and Jennifer Lawrence, and I've heard fantastic things about this film. What do you think of the rest of the Golden Globe best picture nominees - were they all worth seeing? I would definitely recommend seeing Argo and Les Miserables if you're looking for something to watch this weekend.We're excited to finally have a relaxing weekend, and I hope you have the same!

January 24, 2013

Easy Red Beans and Rice

I didn't grow up eating a lot of red beans and rice, but the other day I could not stop thinking about the dish. This is in no way an authentic Cajun recipe - you'll need to go elsewhere for that. It is though, a quick and delicious recipe that is super easy to make.


Red Beans and Rice
Serves 2

1/2 C rice
1 C chicken broth
1 15 oz can red kidney beans, rinsed and drained
1 link sausage*, cut into small pieces
1/2 T butter*
1 shallot, diced*
2 cloves garlic, minced

1. Stir rice and chicken broth together in a medium saucepan. Bring to a boil.
2. Cover rice and simmer for 20 minutes. Do not stir.
3. While rice is cooking, heat butter in a pan over medium high heat.
4. Place sausage in pan and brown for 2-3 minutes.
5. Add shallots and garlic to pan with sausage and cook 5 or so minutes until the shallots are translucent.
6. Reduce heat to medium low and add kidney beans to the pan with the sausage. Stir together.
7. When the rice is finished, fluff with a fork.
8. Put rice in bowl or on a plate. Top with bean and sausage mix. Serve immediately and enjoy!

*Tips and Tricks:
  • I used jalapeño chicken sausage this time around because I had a coupon for it. Use whatever type of sausage is your favorite. Also, when I make this again I'll be adding another sausage link. One would be enough for most people, but both Lars and I wanted a bit more meat in the dish.
  • Feel free to substitute olive oil for butter. I usually use olive oil, but I like the crispy outside the butter gives the sausage in this recipe.
  • If you don't regularly stock shallots in your home use 1/2 of an onion.
  • We had enough left over for Lars to take a good sized portion for lunch the next day. If you want to get dinner for two and lunch for two out of it, increase the rice to 3/4 cup, the chicken broth to 1.5 cups, and throw in an additional sausage link. 

January 23, 2013

Red Peplum and Flats

I absolutely love the simplicity of wearing dresses, especially to work. I am a huge fan of just slipping on a dress, throwing on some jewelry and shoes, and being out the door in no time. You don't have to worry if your pants match your top, if your top goes with your sweater, if your shoes are too tall or flat for your pants, or whatever else your worry may be. I'm a flats girl so I love that the flats below are dressy enough to go with the structured peplum dress.

Red Peplum and Flats

January 22, 2013

Pinterest Fail - Zucchini Lasagna

Before I begin this post I want to have the following disclaimer:
This was only my experience. It seems as if plenty of people have made this recipe without incident. I, however, failed miserably. 

I've been seeing a recipe for zucchini lasagna floating around Pinterest recently, and I even have it pinned to my food board. I decided the other night to try the recipe so I bought zucchini, beef and crushed tomatoes at the store, and I seemingly had everything else I needed at home. Now, I may not always be the best cook, but I can follow a recipe. So I cut the zucchini, salted them, squeezed out the excess water, and even broiled them a bit. I cooked the beef and drained off the fat.

Then my issues began. I added the tomatoes and their juice to the beef mixture. The recipe said to add no extra liquid - the sauce was supposed to be thick. I realized though, that without liquid, a beef and tomato mixture cannot accurately be defined as a "sauce". My sauce was not a sauce. I figured that the recipe said not to add any liquid so it would be fine. I started layering my lasagna - not saucy sauce, then zucchini, then the ricotta mixture, then the mozzarella... oh wait. My mozzarella block was moldy, and I was not about to go back to the store. I found some string cheese in the fridge - the package says "Mozzarella Sticks". A perfect solution! I tore the cheese sticks apart and continued layering my lasagna. I then covered it and baked it for the 45 suggested minutes.

Only when I removed the foil did I truly know something was wrong. My not saucy sauce had not magically liquefied in the oven, and much to my surprise, mozzarella cheese sticks don't actually melt in the oven. They may be sticks of mozzarella, but I am now questioning the quality of said mozzarella. Instead of melting, the cheese sticks stayed just as they were and only got rubbery. So what do you think, do you think I nailed it?


Between the now dried out beef and the cheese rubber, both Lars and I decided it was inedible. Needless to say, after that flop, the hamburgers we went and got for dinner that night were heavenly. :)

January 21, 2013

Secret Passageways

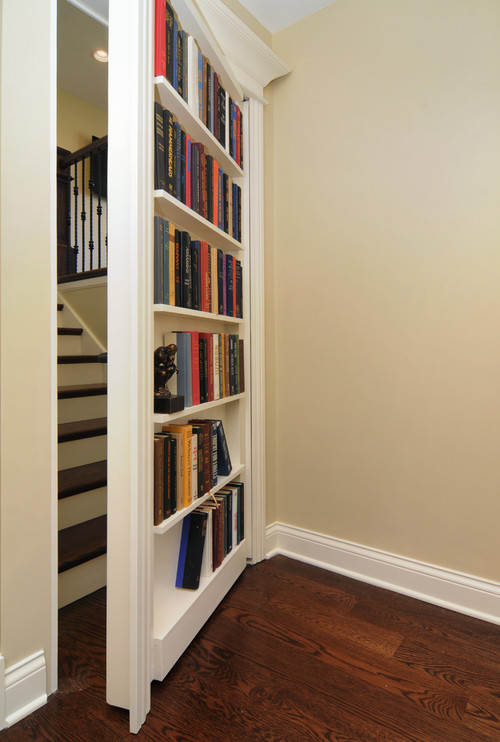
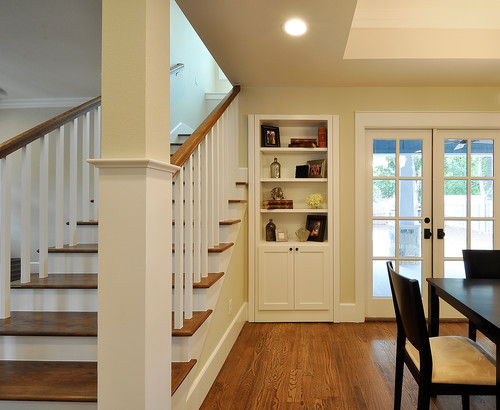
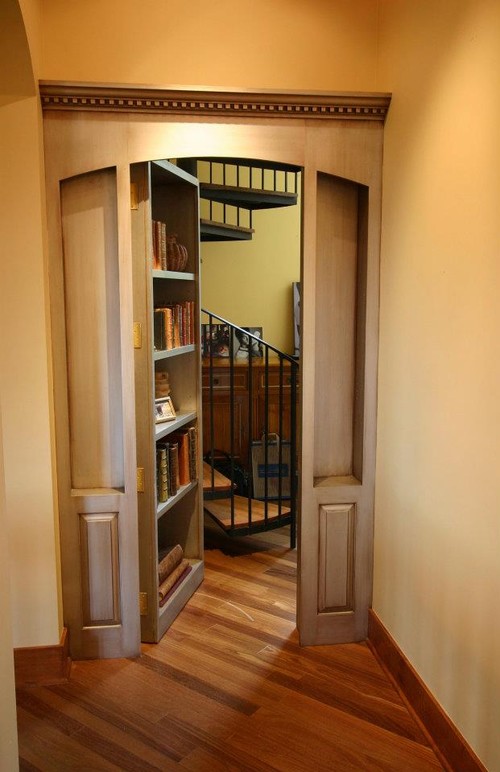
One of the design features I have always wanted in a house is some sort of secret passageway. I want it to be super secret as in people-who-come-over-have-no-idea-it's-there secret. It's not a secret passageway if it has a door handle on it. Maybe it goes to an extra room, but a door handle = a non-secret room. Here are some great ideas of how to build a secret passageway into a home.

                                            Traditional Staircase design by Chicago Design-build A. Perry Homes

Before:
                                          Traditional Closet design by Austin Architect Nick Mehl Architecture
After:
                                                Traditional Closet design by Austin Architect Nick Mehl Architecture

                                              Eclectic Kids design by Minneapolis Architect Kuhl Design Build LLC

Clearly bookshelves are an easy way to hide an entrance to a hallway or room. I like to think that you could add a button or handle behind a painting to open up the wall and reveal a secret passageway.

Maybe I've read too much Nancy Drew in my lifetime, but there is just something mysterious and wonderful about a secret passageway, don't you think?

January 18, 2013

Sweet Potato and Butternut Squash Soup

I've been wanting to make a new soup that required the use of my new immersion blender, and I found this yummy looking one on Pinterest that I changed up a bit. I decided to supercharge the soup by adding butternut squash in addition to the sweet potato, and it was delicious! I served it with small smoked Havarti grilled cheese sandwiches. The smoked Havarti was on sale at the deli counter, and it ended up being a perfect pairing with the creamy soup.


Sweet Potato and Butternut Squash Soup
Serves 2

1 medium (or 2 small) sweet potato
1 small butternut squash*
1 cup chicken broth
1/2 cup milk
Pinch of garlic salt
Pinch of chipotle chile powder*
2 Pinches of table salt

1. Heat oven to 400º.
2. Slice squash in half lengthwise and scoop out pulp and seeds. Prick sweet potato a few times with a knife.
3. Place squash and sweet potato on foil-lined baking sheet.
4. Bake for 1 hour or until squash and potato are tender.*
5. Combine chicken broth, milk, and spices in a large saucepan over medium low heat.
6. Add cooked squash and sweet potato to saucepan.
7. Either blend ingredients together in the saucepan or transfer soup to a blender and blend until smooth.
8. Add extra broth if necessary. Taste and add more salt or spices if necessary.
9. Serve with chopped avocado on top and a grilled cheese if desired.
10. Enjoy!

*Tips and Tricks:
  • The smallest butternut squash I could buy weighed 3 pounds. Small is relative. Just buy whatever you can - you'll make it work.
  • If you don't have chipotle powder feel free to substitute smoked paprika or cayenne pepper in its place.
  • I used small sweet potatoes and they only needed 30 minutes to cook while the squash needed a full hour. If you're using a medium or large sweet potato it will need 45 minutes to an hour like the squash. Just poke it every so often with a fork to see if it is soft and cooked through.
  • This recipe made enough for Lars and I to have for dinner and for me to have a small lunch the next day. Feel free to double or triple the recipe if you're making it for a larger group.

January 17, 2013

Get It Done Today - A Five Minute Organizing Tip

I have a new top resolution for 2013:
Don't put off a task that will take less than 5 minutes to complete.
I followed a link on Pinterest and read this article, and tip #5 really hit a chord with me. Basically, the tip is to not put off doing a task that will take you only one minute to complete. Tasks like filing that important paper away and actually shredding the junk mail the day you receive it. Tasks rarely take less than a minute to complete, but the idea is not to put off until tomorrow what can easily get done today. I am the queen of putting tasks off until tomorrow (or the day after that). It will take me a week to unpack my suitcase. I will move a piece of paper from my desk to the top of my filing cabinet and feel like I've done something. I will walk past dried dishes like this all day long.
It only took me 3 minutes (I timed myself) to put the dishes away and get the countertop back to normal. (Yes, we're quite fancy and leave the blue plant water pitcher, the bottle cleaning brush, and the drying rack on the counter at all times.)


Simple tasks like putting away the dishes or folding the throws on the couch make a home feel so much less cluttered and more peaceful. So here's to working on improving ourselves and unpacking the day we get home.  :)

January 16, 2013

Rainy Day Grey

Sometimes you just need to match the rainy day, and I am fairly certain this jacket would get me through countless rainy days.

Rainy Day Grey

January 14, 2013

My Favorite Christmas Presents

Now that I've had a few weeks to test drive all of my Christmas presents, I wanted to tell y'all about a few of my favorites. I'm not sure if I've said it on here before, but I am attempting to teach myself how to sew. I've been talking about taking a class at the Austin School of Fashion Design for months, so my parents were kind enough to buy me their beginning sewing class for Christmas!

Not the greatest picture of me, but look at the skirt I made! Sure the fabric is ugly, and it's not my cut, but the important take away is I made a skirt!! Rachel was an awesome teacher, and if you're in the Austin area and want to learn how to sew, I cannot recommend them enough. 

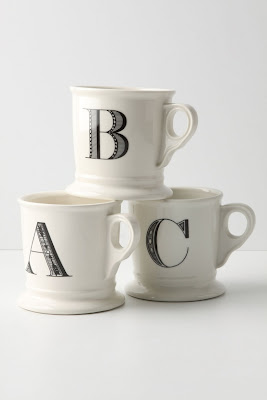
I had been wanting an immersion blender for quite some time. I've found that having to blend soup in the blender in 4-5 batches can be quite the hassle so this was a major convenience item for me. I was able to use it for the first time recently for a sweet potato and butternut squash soup (recipe coming later this week!), and I love it! I also specifically requested this mug - in an "A", of course.


And finally, my sister-in-law, knowing me all too well, bought me a customizable, monogrammed desk calendar/to-do organizer!


I hope y'all have had fun over the past few weeks playing with your Christmas presents! Is anyone else having a hard time getting back into this work routine after the break? I'm getting back into the swing of things so stay tuned for what's to come later this week!

January 10, 2013

Individual Chicken and Biscuit Pot Pies for Two

I love chicken pot pie, and to me the only way to eat it is where I get to have my own biscuit. That means I have to make individual pot pies or Lars would never get to have any biscuit with his. (What can I say, I love carbs!) It's been rainy and cold here in Austin lately, and chicken pot pies seemed to fit the dinner bill nicely.

Individual Chicken and Biscuit Pot Pies for Two
Hands on Time: 25 minutes
Total Time: 55 minutes plus cooling time

1 chicken breast, cooked and cubed
½ small onion, diced
1 carrot, sliced
1 sm/med. red potato, cubed
½ celery rib
1 Tbsp butter
1 Tbsp flour
1 C chicken broth
½ C milk
½ tsp garlic salt
Pinch of table salt
Pinch of black pepper
-----------
½ C plus 2 Tbsp self-rising flour**
Pinch of sugar
2 Tbsp butter, cold and cubed
¼ C milk

1. Preheat oven to 375º.
2. Heat 1 Tbsp butter in sauce pan until bubbling.
3. Add 1 Tbsp flour to melted butter and whisk together for 1 minute.
4. Add in chicken broth and milk and whisk 5 minutes.
5. Add chicken, vegetables, and spices to liquid mixture and stir to coat.
6. Remove from heat.
7. Prepare biscuit topping.
     -Stir self-rising flour and sugar together.
     -Cut in the butter until the mixture is crumbly.
     -Stir in the milk, adding extra by the teaspoon as needed if the mixture is dry.
8. Divide pot pie mix into individual ramekins or oven safe bowls.
9. Drop biscuit mix onto the pot pies.
10. Put ramekins on a baking sheet to prevent spilling and put in oven.
11. Cook 30 minutes or until the biscuit topping is browned to your liking.
12. Let cool 10-15 minutes before serving and enjoy!

**Tips and Tricks:
  • If you don't have any self-rising flour mix ½ cup regular flour (plus the 2 extra Tbsp), ¾ teaspoon baking powder, and ¼ teaspoon salt. (Self-rising flour just has the baking powder and salt already mixed in.)
  • If you’re only cooking for two, don’t regularly stock celery in your fridge, and have no further use for celery just leave it out. Don’t buy a whole bunch of celery just to use ½ a rib of it.
  • Use rotisserie chicken and pre-made biscuits if you’re short on time. If you do use refrigerated leftover rotisserie chicken just make sure your pot pie mixture is bubbling before taking it out of the oven. You don’t want a perfect biscuit on top but a cold mix underneath.
  • I pounded my chicken flat to speed up cooking time and cooked it while I was chopping veggies. That way, I added warm rather than refrigerated chicken to the mix and my hands-on time didn’t increase because I was doing two things at once.
  • I used low sodium chicken broth. If you use regular chicken broth use ½ tsp garlic powder rather than garlic salt and omit the pinch of table salt.
  • If you want to make this for more than two people just double, triple, or whatever the recipe to serve your desired number.

January 9, 2013

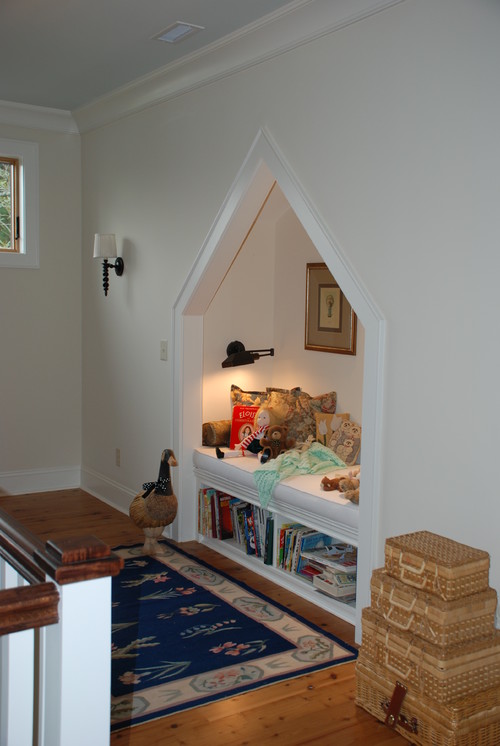
A Reading Nook

Ever since I made my nieces poufs for their new reading area in their playroom, I've been looking at reading nooks for adults and kids alike. Growing up my favorite place to read was in this cushy yellow gingham chair that sat in front of the window in our spare bedroom. Now, I would love a space that had no other purpose than to be used to enjoy a book. The top and bottom nooks pictured are definitely my favorite - one is dark and moody while the other is light and bright, and they are both fantastic!


January 7, 2013

Red Pants and Leopard Shoes

I have been on the hunt for the past six months or so for the perfect red pants and leopard flats. I have tried on, purchased, and returned countless of both with no luck thus far. I still keep my eye out for each, and I'm hoping to find what I'm looking for soon! Until then, I'm perfectly happy dreaming about the outfit below, plus we all know I love a well-tailored blazer.

Out ShoppingOut Shopping by awmc56 featuring topshop

January 4, 2013

Reading Poufs (aka Floor Cushions)

My brother and sister-in-law moved into a new house right before Thanksgiving, and my brother built his two girls rain gutter bookshelves like the ones below.


Since the girls now have a reading nook, I decided that they needed poufs to sit on as they read on the floor. I found this tutorial online, and I think mine turned out pretty well!


It was so funny to watch the girls (who are only 4 and 1.5 years old mind you) pick their poufs and become immediately possessive about whose was whose. If I ever make these again I would do a few things differently, so hopefully you will find these helpful too.
  • I bought more "inner fluff" than I thought I would need, and I ended up using every bit of the 5 lbs (2.5lbs/pouf). Use more fluff than you think you need. (I also used two 15-pound kettle bells as my 30 pound child to test the resilience of the fluff.)
  • If you use extra fluff like I did you may want to reinforce the stitching of the middle part of the pouf because a single stitch seam tends to pull and possibly rip.
  • Actually, just reinforce all of the stitches. I wasn't expecting my 4 year old niece to pretend the pouf was a horse and bounce around holding the handle as reins. (I know. WHY did I not see that one coming?!) She came to me crying because she found a hole where the stitches had pulled out of the fabric. Thankfully Aunt Anna is a whiz at hand-mending just about anything.  :)
When all was said and done each pouf only ended up costing me about $20 to make thanks to some great JoAnn coupons, and I will definitely make these again for other little ones in my life. If you decide to make a pouf, let me know if you have any questions - I'd love to help!

January 1, 2013

New Year's Goals

Happy New Year!
Growing up I never liked the idea of New Year's resolutions. They just seemed like things you said because you were supposed to yet all the while knowing full well you'd never do any of them. As I've gotten older I've rebranded resolutions as goals. Maybe they're the same thing, but to me they feel different so it helps. (I've also read somewhere to call them "New Year's Intentions". I kind of like that too.) I enjoy taking time to reflect on the year that has ended and looking forward to the possibilities that a new year holds. It always feels like a bit of a clean slate - no matter what I messed up on or didn't finish in 2012 I can change or do better in 2013. That glimmer of hope helps us move forward I think. In the spirit of the new year, I figured I'd share a few of my 2013 goals with y'all.
  • Learn a good bit of medical Spanish
  • Sew (and wear!) my first dress
  • Quilt a bedspread for Lars and I
  • Finish the Coursera courses I am signed up for
Most of my goals for 2013 involve learning, being more creative, and actually finishing what I start. I am great at beginning projects - I just need a bit of work on actually completing them. Those are just a few of my goals that I wrote out last night and am striving to accomplish this year. What are your 2013 goals?